08 August 2011

Test Rides!

There are two little bike shops near my house that have been tempting me for months. I finally made time this weekend to test ride a couple of bikes. The first store is a classic LBS with a variety of bikes chained out front - road bikes, hybrids, city cruisers, kids bikes and more. The one that caught my eye, though, is the red Xtracycle. I've seen a few around the city and I know people who swear by them for transporting kids and cargo. I was especially curious to see how it compared to riding with a trail-a-bike.

I first tried it up and down the block on my own to see how it handled. My first impression - it's solid. The trail-a-bike has a slight side-to-side wobble, no matter how much you tighten the screws. I've gotten used to it, but have to admit that the Xtracycle did feel more secure. However, it is long, so you still have to allow for a much wider turning radius. Still, it didn't seem to take much to get get used to it, so I rode back to the shop and picked up my passenger.
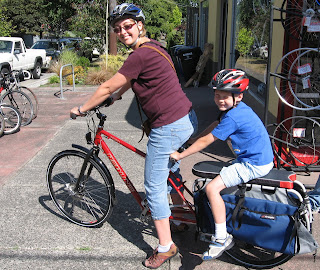
Adding a passenger didn't change the handling much, aside from the extra weight. It still felt solid and secure. The bike isn't light, but it's not as heavy as I expected. It's heavier than Ye Olde Mountaine Byckke, but not by much, and it's considerably lighter than the Byckke plus the trail-a-bike. I didn't want to take it out too far, since it didn't have the foot rest attached, and I was worried Spencer might kick the chain. Because of that, I really can't call this a thorough review, but it did make a good first impression. I had no problem getting up the gentle hill back to the bike shop, but didn't test out any serious hills. It's hard to say whether I'd miss the extra push from the back seat or not, given the diffence in weight. However, it definitely has better "hop on and go" vs. a trail-a-bike, especially since I usually detach them and lock them together.

Spencer found the back seat comfortable. It's well padded and cushioned the bumps in the road, not that I was deliberately aiming for them. At least not many.

When asked what it was like to ride, he said "Easy!"
Me: How did it feel?
Spencer: Good!
Me: Do you like this one better or the trail-a-bike?
Spencer: This one. I don't have to pedal so my legs don't get tired!

Hmph. And here I thought he might get bored without his own pedals. Active transport my @$%......


The next stop was two doors down at an electric assist bicycle shop. This shop, which opened about 6 months ago, carries the Ohm bike, made in Vancouver. After a little chitchat and signing a waiver, I was out the door on their city commuter bike, while the store employee rode the sport version beside me.

The commuter bike is a solidy built bike, that feels quite upright and cushioned. It's heavy - about 53 lbs - and, with the low center of gravity from the battery, it feels very stable. It handled smoothly on turns, though I didn't try any particularly aggressive moves. The electric assist controls were very intuitive and easy to use. I didn't notice much with the two lowest settings - it just seems to take off a little bit of weight. Settings 3 and 4 are pretty cool, though. At first, I slowed down, expecting the motor to pick up the slack, but I quickly ground to a halt. The motor actually multiplies the effect from each pedal stroke, so the harder you push, the harder it goes. Once I started pedaling, I could really feel it pulling the bike forward. I still had to work to get up a steep hill, but not nearly as much - I was able to keep up a conversation and go much faster. The bike was very quiet and free of vibrations.

Although I'm not looking for an electric assist bike right now, I can see the appeal - it would makes Seattle hills much more manageable. If I had to tow kids daily or if I developed a health issue that made a regular bike too much effort, it would be a great option. Or, of course, if I ever move to Phinney Ridge. The downside is the price - at $2800 US, it's a pretty expensive bike. I've never tried another electric assist bike, so I can't say how it compares to others. It did rides well, though, and was a lot of fun.

This was my "test ride a different kind of bike than you normally ride" entry for the LGRAB Summer Games.

07 August 2011

Musical Bells

On our way home from last week's group ride, Spencer started to complain about his handlebars. I stopped to investigate and, sure enough, they were a little loose. "Well," I told him, "I don't have any tools with me. We're close to home, so just hold them carefully and I'll fix it when we get there." That worked for less than a block before he started to shout again. I told him to hold them up and that I would ride very slowly and gently.

When we finally got home, I was shocked at how loose the handlebars had become. It was particularly embarrassing, since I had just been leading a bicycle advocacy group ride. Thank goodness the problem didn't develop until we were on our own and almost home! I was also very surprised; I'm pretty good at remembering to check that the connection to my bike is secure and that the pedals are screwed in tight, but I'd never had a problem with this connection before. However, if you look at the photo below, it was so loose that the handle bars could spin right around and slide from side to side.

Fortunately, a quick twist with a hex wrench tightened everything up. I may need to start carrying a bike-combo tool with me.That was finished quickly, so I decided to do the other job that I'd been meaning to get around to - musical bells! Spencer has now outgrown his 16" wheeler, so we decided to move the bell to the trail-a-bike.

Ta da! Secure handlebars and a bell that lights up!
Next, I re-installed a Bell bell on Ye Olde Mountaine Byckke. I had tried to put the bell on my road bike, but it never fit well on the handlebars, so back it goes.
Finally, a shiny new bell was installed on Spencer's new 20" wheeler.Because a boy this proud of his new bike deserves a shiny new bell to go with it!

This is my "perform a maintenance task on your bike" entry for the LGRAB 2011 Summer Games.


04 August 2011

Ballard Greenways

If you've talked to me in person in the last few months, you've probably heard me talking about Neighborhood Greenways*. To crib from a previous post "These are quiet streets that give priority to cyclists and pedestrians, while still allowing motorized traffic at lower speeds. They're for people who don't want to ride on the busy arterial streets, but still need to go somewhere".


A group of folks in the Ballard neighborhood of Seattle have been meeting to discuss Greenways, why we think they would be great for Ballard and how to organize to bring it about. We now have a name - Ballard Greenways** - and a facebook page.

Last Sunday, I organized a group ride to tour some of our proposed routes and to start promoting the idea to the community. We timed it to finish at the Summer Field Day, a kids' event featuring outdoor games and races at a local park. A couple of neighbourhood blogs were good enough to post about the ride (Thanks MyBallard and Totcycle!), which brought us a few new folks. There was a steady drizzle all morning and I was concerned that I might have to cancel. However, the rain stopped midday, so the ride was on.
Chatting about the route as we wait for everyone to arrive.

This was the first time that I had brought Spencer for a group ride. He was very interested in this little girl in her trailer.

Spencer found it hard to resist touching everyone else's bikes. Resist? Who am I kidding? He didn't even try. Clearly, this will take more discussion and coaching before I try it again. However, once we got on our bikes and got rolling, he did great.

I'm afraid I don't have any photos from the ride itself. Leading the ride, watching Spencer, and talking about routes took all of my attention. Next time, I'll have to pass the camera on to someone with a free hand. However, it went really well. There were good discussions about the advantages and disadvantages of different routes. We were treated to a little local history about an old theatre and the old bus and streetcar routes.

I know we'll have to be patient and that this will take a lot of work. The group rides and discussions over a beer are pure fun, but the serious organizing is just beginning. Still, I'm really excited to see how many people are enthusiastic about bringing better and safer infrastructure to our neighbourhood.

*After 10 years in the US, my writing is a random mixture of Canadian and American spellings.

**Cause we're creative like that.


This is my group ride entry for the LGRAB Summer Games 2011.

02 August 2011

Proofide and Upgrades for Eliza and Bert

Eliza Doolittle (the rod-brake '78 Raleigh DL-1 that used to be Fiona's) came to me with a Brooks B-66 saddle. Then I scored a ridiculous deal on a vintage B-66-S on eBay, which I installed on Eliza, and Bert inherited the B-66. So we now have two vintage Brooks saddles, one of them almost as old as I am, that are a bit dry and stiff, but seem to be in great shape (little surface cracking), despite their age and unknown maintenance history. I thought it would be best if I gave them some love.

Eliza's new-to-her vintage B-66-S before treatment.
The 1978 B-66 that's now on Bert. Poor thing probably hasn't seen Proofide since the factory. 
I know there's a perennial discussion going about alternatives to using Brooks' Proofide product to condition and waterproof saddles. Everyone from Sheldon Brown to the guys at BikeForums.net have weighed in at some point on it. The neetsfoot oil used to soften baseball gloves is often suggested instead, particularly for reconditioning older leather that has dried out, but some think it can make the leather too soft and ruin the saddle. My feeling was, in this case, using something other than the saddle goop recommended by the original manufacturer might be false economy, so why overthink it, especially when I can easily buy it at my favourite LBS for less than twenty bucks? (However, vegetarians take note: if you've decided to use an existing leather saddle, you'll want to research the alternative products that are available, since one of the main ingredients of Proofide is, um, beef tallow.)

This is how much Proofide I was told I should use. 
Like the old Brylcreem ad says, a little dab will do ya...

...unless your saddle is as ancient and neglected as mine were. Here is the B66S gooped up with about four times that amount, spread in a super thin layer all over. Immediately after spreading the goo (it feels just like hair wax, too) and taking this photo, I wiped off the excess with my rag.

Here's what it looked like immediately after I wiped the excess off (still a bit shiny). If you look at the cloth on the rack, the slightly discoloured part was used to wipe. After taking this photo I went in with a corner of the rag to get the little globs on the edges of the holes. At the advice of the guys from redbike, I only did the top, not the underside (apparently the underside is only needed if you don't have fenders.).

And here is Bert's B66 gooped up with six times that fingertip amount - it was thirsty! After taking this photo, I wiped the excess off, then redid the driest bits with another two fingertips' worth.

This is how much was used out of a 40 gram tin - the smaller 25 gram tin would have done me just fine. I think 40 grams might be a lifetime supply, if the stuff doesn't go rancid.

Here is Bert's saddle when I was all done.

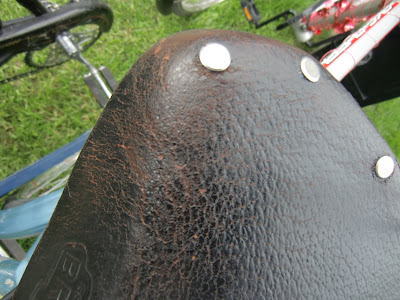
Here's a detail of one of the driest parts of the saddle after treatment - you can see that the surface of the leather had started to crack and flake a bit, and it's rough enough that it was pulling tiny threads from my wiping rag - but feeling much smoother and looking better now.

The nose of the saddle was the other especially dry bit that got a second application of Proofide. I also noticed that the saddle looks like it may need retensioning, so I'll get the guys at redbike to do that for me soon.

The chain on Bert was looking pretty cruddy and a bit rusty in spots, so I decided to apply some lube next. One generous drop per link, on the little roller in the middle (whatever it's called), then wiping off the excess with an absorbent cloth.

The oil I used, bought at MEC, feels like veggie oil, because it pretty much is veggie oil. Since its purchase I've learnt that this stuff gets brutally sticky in our climate, and catches all kinds of road gunge, in addition to being best for the warmest temps - but since I'll only be riding Bert with the trailer bike attached on the neighborhood sidewalks with my kids during the good weather, I might as well use it up.

The chain looked much better, and the rag looked much worse, when I was finished, and my hands were nicely moisturized from the veggie oil. ...I guess the next job will be to clean all Bert's little rust spots and carefully apply some wax or clearcoat.

Lookin' pretty good, Bert.

Since I last griped about Bert, the correct Shimano shifter has been found and installed, the rear wheel has been pulled back so the chain isn't too loose, and the Wald rack and a Crane bell have been installed, with the expert help of both Coreen and Keith at EBC. I'm still figuring out the little chainguard rub and trying to decide if the handling only feels squirrelly when the trailer bike is on it or if the headset needs attention or what. But all in all I feel pretty good that I've at least been in the room watching and taking mental notes and that I've gotten my hands good and dirty getting Bert to the point where he's useable, even if my husband never ends up riding the darn thing. 

Eliza just came home this afternoon from a holiday at redbike with her new Steco rack with integrated kickstand (ordered online through the legendary David Hembrow's Dutch Bike Bits, because redbike couldn't special order it through their suppliers), and the same kind of rear light that Pashleys have installed. They also tightened the tension bolt in the vintage Brooks B66S for me because they noticed the leather was practically touching the rails. Thanks guys!!

I also upgraded Eliza with my vintage chromed Miller bell, which used to be on Mary Poppins. (The little bell that came with Eliza got inherited by Audrey's balance bike.)

A clear plastic shower cap will make a handy rain cover for the saddle until I can get something cuter.

Next I needed to install my antique quarter-sawn oak egg crate, to complete Eliza's transformation into Super Grocery Bike. I carefully lined everything up so the crate is centred and the screws for the homemade clamp have lots of clearance. The back edge of the crate is just off the rack to give me the most possible butt clearance for riding comfort.


View of my home-made clamp from the top.

 
I tightened up the thumbscrews and voila! This is super sturdy and ready to carry a fairly heavy load.

 
The egg crate is now solidly clamped onto the rear rack.
Eliza is looking so useful and beautiful and timeless!

 
About a half hour after Proofide application, the saddle is looking much less shiny. 
I'll still wait overnight before I take it for a spin.

As a finishing touch, I added fabric flowers to her front basket (I had these on the egg crate last year).
 
Eliza's ready for her first grocery run!

PS: This post is part of our series for the LGRAB 2011 Summer Games! This is a "perform a maintenance task on your bike" post.

01 August 2011

Book Review: It's All About The Bike

If you're entranced by the stories behind bicycle components or the history of bicycles, have I got a book to recommend to you:


I've just finished reading the Kindle edition of Robert Penn's "It's All About The Bike", in which he had a bespoke bicycle made and traveled to each of the factories and workshops where the components were manufactured. I'll admit, I skim-read some of the parts about parts, and the bits about bicycle races were not for me - but the anecdotes describing the history of bicycle design kept me coming back for more. The lyrical passage in which he describes watching a legendary master at work lacing and truing a bicycle wheel is worth the price of admission all by itself:
"I've seen skilful bike mechanics work their magic and I had anticipated the visual pleasure. I hadn't expected the wheel-building process to be an aural feats too. The metallic brush of the spokes being gathered in hand, the ting of a spoke as the elbow dropped into the flange, the scuffle of the nipples moving on the workbench, the whirr of the wrench fastening the nipples, the swish of the loosely suspended hub flopping about. Ping, ding, tinkle, chink, clink, jangle -- as Gravy worked in silence the room was humming with the century-old melody of a bicycle wheel being made."
I definitely feel like I have a much greater appreciation for the technical side of cycling and a deeper knowledge of bicycling history as a result of reading this book. If you're a gearhead or a history buff, I think you'll enjoy it too.

I'd actually suggest reading the hard copy of this, if you can. Due to the typesetting quirks of the electronic edition, I often would find myself in the middle of a paragraph before I realized that he was directly quoting the person he was conversing with. It's incredibly annoying to have the flow of the story be interrupted by such a minor technical detail.

PS: This post is part of our series for the LGRAB 2011 Summer Games! This is a "read a book about cycling" post.