26 June 2010

Canada Day Bike Decorations (LGRAB Summer Games post 5)

Today I'm blogging about decorating a bicycle, as part of the Learning Experiences section of the LGRAB Summer Games.


This evening I spent some time decorating the CCM Bike Buddy that we acquired last week (from Kijiji once again). It's rather plain, so my girly-girl Audrey was really excited today when I suggested that we pick up some craft supplies and decorate it for Canada Day. We got some sparkly wired maple-leaf garland, wired polyester ribbon, and some flags of varying sizes. Here's the result:


We: poked small flags into the holes for streamers in the handles; used clear packing tape to attach a larger flag at the top of the safety-flag pole; and wrapped the garland around the frame of the bike. Nothing we did is permanent, although it should be pretty durable if Audrey doesn't want to remove it all as soon as Canada Day is over.


The ribbon-woven spokes were really time-consuming, but they look great! Basically they're a slightly more sophisticated, more permanent version of the crepe-paper streamer spoke decorating you see on sites for kids like the ones in this roundup. (Aside: I am jonesing to make a grownup version of the beaded handlebar streamers they link to!)


Here is what it looked like before decorating, when I was trying it on Bert for size. I think we'll add some stickers on the chainguard as the finishing touch. Now we just need to finish getting Bert running before the 1st of July!

Carrying A Load (LGRAB Summer Games post 4)

Today I'm blogging about carrying a load as part of the Learning Experiences section of the LGRAB Summer Games.


Originally I was going to use the freeloading trailer for this post, but then something snapped inside Angel's kid trailer attachment - and freeloading trailer got used for parts. So instead, I decided to try a grocery run using a box. There is a long and noble tradition of using fruit boxes and milk crates for carrying loads on bicycles. I love both the utilitarian look of a milk crate, and the romance of using a vintage wood box; but I wondered, which would be more functional? So Angel and I decided that we'd do a head-to-head comparison.


I started by looking at a couple of old plastic milk crates I had in my basement. (These were inherited from postdocs moving to other cities, and are not from local dairies, so no ratting me out to The Milk Crate Recovery Team!) There are a couple of posts out there that describe methods for attaching a single milk crate to your back rack using a bungee cord or some simple hardware-store finds. If you want to attach two crates,  without making mounting a top-bar bike like Bert completely impossible, you can try the simple method at Dinosauropedia to make milk-crate panniers, which looks much more stable than just tying them together with rope(If you're looking to use other types of plastic bins or buckets for panniers, there's inspiration to be found at EcoMetro.)

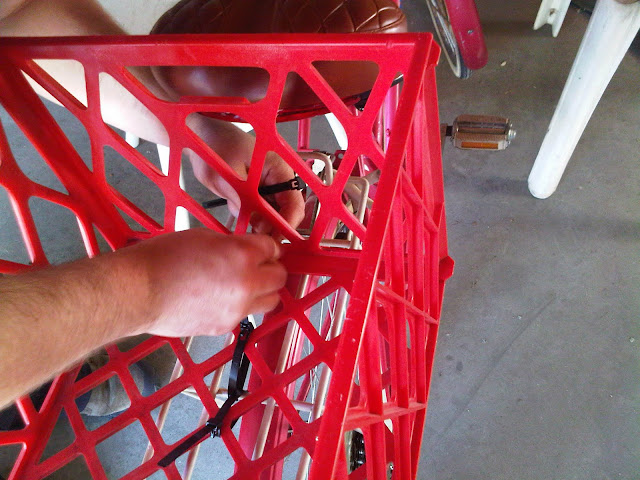
I ended up deciding to give Angel a red milk-crate-clone with a Chinatown shop's price sticker, which would be perfect for on the rack on Daisy. Since most people attach them with zip ties, that's how Angel attached hers for our testing. She has already described her first experience hauling groceries using the milk crate. Her load was: 4L jug of milk, 2lbs grapes, ~2lbs cherries, 1lb blueberries & 6 pack clamshell of pastries; her wish list for next time is some canvas bags and bungee cords.  

Eventually I want to attach this sturdy fruit box ($12 at a local antique mall, and I won't even have to reinforce it!) to the back of Mary Poppins, whose 28 inch wheels will accommodate a larger-scale box:

I haven't quite decided how I'll do that. The easiest thing would be to find an appropriate rack to fit the bike, then attach to that, but I've been having a LOT of trouble (including buying and returning a couple that were recommended) finding one that will fit onto Mary's 28-inch rear wheel with no extra hole above the dropout. Perhaps I'll get someone to make something like this bracket for me, or special-order one from the UK (they're made by Adie) - or maybe I'll DIY something using pipe strapping. Once I have a way to attach it, I can take inspiration from one of these similar projects using wooden boxes. Meanwhile, I have lightly sanded the box and given it a coat of this to protect it:

I also chose this gorgeous antique wooden egg crate ($38, but look how pretty):


It's wonderfully versatile, since I can use basket straps to attach it to the handlebars like this...

...or attach it to a rear rack like this:


Turns out the egg crate is the absolute perfect proportions for on the NOS Steco rear rack that was on Bert. (I say "was" because attaching the CCM Bike Buddy trailer-bike for the kids, which won't fit onto Mary thanks again to her 28 inch wheels, involved removing said rack from Bert. More about Bike Buddy another time.) The way this bike box on Etsy attaches looks especially elegant, so I decided to do something similar with carriage bolts and thumbscrews.


But first I needed to figure out how to attach the Steco rack to Mary, who has wire fender stays. A comment by Coreen about how they had macgyvered the connections on a similar rack at EBC got me thinking about what I could use in place of the provided hardware. The solution: 3/4-inch copper pipe-hanger clamps, which are sold for a pittance in the plumbing aisle of your local hardware store, are pliable enough to be easily bent from their U-shape to go around the stays of the bike, and are soft enough that regular drill bits could be used to enlarge the nail-holes to accept the screws from the other hardware. I cut a leftover piece of rubber gasket to fit inside so the paint on the stays wouldn't get scratched and to improve the fit. It looks great, and feels really secure!


22 Oct 2010 Update: After a couple of bumpy rides I managed to lose one of the nuts you see below - so if you're doing this, add some Threadlock (from the adhesives aisle at the hardware store) to keep your rack in place. Also: be aware that this solution is fine for carrying cargo, but the weakest point is still going to be the attachment point and therefore your rack won't be able to carry as heavy a load as it may be rated for. So, you know, no attaching a child seat to this, m'kay?


Now for my DIY wooden attachment clamp. Here's what I started with:


I cut two equal lengths of the hemlock door stop, sized to fit diagonally (to help distribute the load across the slatted bottoms) in either of my boxes, and sanded the cut ends, then marked where the holes needed to go, and drilled and sanded again. I won't give measurements since it'll vary with the box and the rack you're using. The 2-inch brass carriage bolts are fine for the fruit box, but just a smidgen too short for the quarter-sawn oak of the egg crate, so I needed to go back and get 2.5-inch ones as well.


Also, the bottom of the egg crate was not attached to the sides, so I predrilled some holes (oak is called hardwood for a reason!) then used 3/4-inch brass wood screws to hold everything securely together.


Here's the finished product installed (some pics with the fruit box and some with the egg crate):


(Clearly the fruit box is too long for this rack, 
unless I install it the other way and double my bike's width.)


You'll notice that Mary Poppins has also been fitted with a double kickstand! This one is meant for 26-inch bikes, so it's OK on perfectly level pavement and too wobbly on rough ground - but it will do until I can find one that's the right size. The kickstand Mary came with was also too short, so this is still an improvement to parking stability. It'll move to Bert once I get the right one for Mary.


Something that the process of installing this baby reminded me: I love having a vintage spanner (aka wrench) from the manufacturer of my bike. It makes these sort of jobs so much easier, because it's designed to fit into tight spaces and fit the odd-sized bolts, and it's great as part of my bring-along toolkit for when the bolts holding my fenders on get a little too loose (as happened on the Critical Lass ride). If you have an old bike and you know who made it, I highly recommend checking the old owner manuals that are online to match up to then eBay to see if you can get the right one for your bike. The Raleigh/Phillips ones regularly go for less than $5 before shipping - well worth it.

My 1960s Raleigh spanner. I use the hex-wrench shape on the end all the time.

The first thing I realized when I started riding was that I hadn't left room for my butt! Luckily this attachment system is versatile, too: I just pulled over, loosened the thumbscrews, and slid the box about and inch and a half further from the seat . No problem.


I wore cotton capris and my favorite flat sandals. This reminds me, I need a pedicure.


The ride to two of the closest grocery stores to my place takes me on a multi-use path through this lovely park:


15 minutes door-to-door, including waiting at the lights on 23rd Avenue to cross busy Rabbit Hill Road as a pedestrian. Not bad! It's nearly triple that when I walk it with my kids in a wagon.

Here is what I bought, about two bags' worth of groceries, including all the items that were on Angel's list. This is totally what I would have bought today if I had brought my car.


I took about 5 minutes to repack the groceries into my baskets. In the future I expect it'll take less time since I will have my packing system figured out. The veggie tray, marshmallows, lemon juice, shampoo, and my purse went into the front basket, and everything else (including my lock) fit into the egg crate. Hey Angel, I think the egg crate wins.


I did find that it was pretty top-heavy, and once I had unlocked from the rack I needed to keep a hand on the bike to keep it from falling over (stupid too-short kickstand). Once I was riding it didn't affect my balance much. By the time I got home, a fender-rub noise had developed, and investigating it showed me that all three of the nuts holding the rack in place had loosened and the whole rack had shifted a little bit to one side. Clearly someone with more hand strength than I have needs to retighten them, and DH has suggested that we try using lock-nuts instead of hex-nuts.

All in all: easy-peasy! I can totally see this being my new evening-or-weekend-morning grocery-run routine - which was part of why I wanted to get a bike in the first place.

Update, 22 Oct 2010: there is also a great wooden-bike-box how-to (with attaching a leather handle!) over at Eighteenth Century Agrarian Business.

21 June 2010

Father's Day Hauling! (LGRAB Summer Games post 3)

Today I'm blogging about carrying a load as part of the Learning Experiences section of the LGRAB Summer Games.


Yesterday was Father's Day, and since I only had Lili home (Damien regularly spends his Saturdays with his grandparents, I'm not complaining at all!) I figured I'd leave her at home and go get a few groceries on my own with Daisy.

First though, Daisy needed more carrying capacity. Deborah donated a LOVELY red "milk" crate. Which we think might actually be just a plastic crate as there's a barely readable tag (dollar store or random flea market variety price tag). Either way, it's gorgeous!

Here's hubs doing the (reusable) zip-tie attachement:


Because my butt is big (total disclosure!) I didn't want the crate RIGHT against my seat so we used the existing rack to kind of pull the crate in a few different directions, and then added side ones to stop side-to-side shakes.

Then I pedaled my way to the closest grocery store. En route I had to wait for an ambulance to turn towards the hospital, turns out an elderly lady had fallen across the street from said hospital, causing a mini traffic jam. I know it's bad, but because I had the option and didn't want to wait in all the backed up traffic and because I was able to, I jumped off Daisy and just walked her on the sidewalk. I stay well out of the way of the ambulance workers and other helpers, but I ended up well ahead of all the cars trying to maneuver around a 4-way stop filled with an ambulance. Biking 1 - Cars NADA!

Anyway, arrived at the grocery store, and locked Daisy up!


Considering my location I was pretty surprised to find NOBODY else had bothered to bike ANYWHERE in the area...I was actually kind of saddened. Anyway, Daisy's crate held all our groceries (including a 4L jug of milk) no problem, I just need to get some bungee cords to hold things down better.

I didn't manage to get a picture when I got home because Daisy's kickstand, well it sucks for holding loads, which means I'm in the market for a double kickstand, I figure it'll be beneficial both with the kids behind me and a full pair of baskets.


Side: Saturday I rode with my sister-in-law and Damien down to our Bikeology Festival Day & other downtown proceedings. It was a BLAST! They closed a bunch of blocks of downtown streets and had various activities, including bike demos, parkour-style bike tricks, bike fixing, and then further down, MEC had a few things, the YMCA had kid-friendly stuff (Damien got "face" painting, played in a pool and did a Zoomba demo with us) plus probably a MILLION other things I missed.

It was really fun and AWESOME to see the amount of people out on bikes taking advantage of the fact that motor vehicles weren't allowed but bikes were! YAAAY Edmonton!!

20 June 2010

Bike seats for bigger kids?

I have been contemplating getting a seat for carrying my kids (aged 4.5 and 7). The BoBike Junior would be a total no-brainer, if it weren't for the price. So I have been looking for an alternative product.


I think I might have found it in the Leco Top Tube Child Seat, which is reviewed in the amazon.co.uk listing and on first4dads.co.uk. Most of the websites that sell it ship only to the UK, but there is one seller on eBay who will ship it worldwide. But here's what makes me really nervous: I can only find two photos of it in use and another two in the wild online. Does it not actually get used because it's uncomfortable? Do kids outgrow it too quickly?


Anyone actually have experience with bike seats for bigger kids?

14 June 2010

Critical Lass at last!

Fifteen fabulous girls came out to ride yesterday despite 27C heat! First we met at Edmonton Bicycle Commuters' Bikeworks. A journalist from Metro Edmonton and a photographer for the Edmonton Journal met us there and took some photos while we did a lap through the back alley.

The front page of today's Edmonton Journal. 

I would like to point out that Miss Sarah is riding without her customary helmet because she lent it, along with a bicycle, to a pregnant visitor from Vancouver so she could join the ride! Do follow the link to her blog, she has all kinds of beautiful photos documenting our outfits that were taken with a better camera and better eye than Angel or I possess. That's me in the polkadot helmet right behind Sarah; Angel is in black helmet and blue skirt toward the back of the other line.

Then we headed off to Ritchie Park (with some water and koolaid from EBC for the players) to watch some of the Velo Polo match. There wasn't much happening when we arrived.

Laura's retro polka-dot blouse was super cute. Not to mention her bike (see previous post). 
I also love the floral print on Sarah's strapless dress, and the fact that it has hidden pockets. Genius.

I love the dresses Marilyn and Leanne were wearing. Sarah is serving some of the koolaid we carried.

Soon a game was started. It looks so cool! I think I'd need a much nimbler bike for the quick stops and starts and a lot of practice to play.


There wasn't enough shade at the hockey rink where polo was being played, so before long we were off again. We rode on residential streets down to the bike path on Saskatchewan Drive, at the top of our city's beautiful river valley.


Poplar fluff snowed down on us as we made our way to the bicycle bottleneck at the end of the High Level Bridge.


We crossed busy 109th Street on the crosswalk, then parked beside Transcend Coffee's new Garneau location.

Mary Poppins parked in the inadequate racks out front.

Iced coffee was the order of the day. A few of the girls also popped into Da Capo for ice cream. I think next time I'm in the University area, I will too.

Then we hung out beside Garneau School's playground and chatted and took photos.

Waiting for more adventures.

Coreen's CCM-built farm-abused Garry... just like Nicki's, but handpainted green instead of red. 
She came to the ride on just 2 hours of sleep after working the repair-a-thon, and was super helpful in orienting our neophyte riders to riding on the road. 


I love how Marilyn's Brompton sits to park. Good puppy.

Some people had to leave at this point, but a few of us took the residential streets of Old Strathcona...


...to our final destination, Fuss Cupcakes. Mmmm, cupcakes, gelato, and Italian sodas.


We spent time both outside and in. Our bikes were all nested and locked together. One guy walking by told us, "Gangs are illegal you know!" What, even when they're as beautifully dressed as we were?


Speaking of beautifully dressed, I do regret that I didn't get any better photos of my outfit or anyone else's in my excitement (Luckily Miss Sarah did.). I wore these brand-new heels...

...and I can attest that it really is easier to ride in heels than walk in them! I also wore the Missy Skirt in eggplant from Nomads Hemp Wear, who are carried locally by both Bedouin Beats on 118th St and Lucid Lifestyle on Whyte Ave. Being a bellydancer, I also have several of their ingeniously seamed yoga-style pants and tanks, and the hemp-blend fabric that they use is super comfy and breathable for summertime wear. The ruffles on the skirt's hem weighed it down so it didn't flip up while I was riding at all. I'm a huge fan (in fact I'm wearing their capri pants as I write this). I was also wearing a teal cotton-jersey blouse from the Gap and a red-violet cotton-jersey cardigan, which was quickly swapped out for sunscreen. But not enough of it. Ouch.

Update: Coreen has more sweet photos of the ride up on her blog, Breaking Chains and Taking Lanes!

Laura's Eaton's Road King

Our friend Laura bought this beauty off Kijiji last week from the original owner:

This is BeBe (short for Blue Bike). Twitpics taken by Laura.

BeBe is an Eaton's Road King, all original (except for the kickstand we installed today at EBC), with 26 x 1-3/8 tires (with no recommended PSI marking), and paint and tire rims in incredibly good condition. We think it's a late-1950s design, based on the finned chainguard. How sweet is that? There are similar bikes pictured in a few places, but very little information online. Also, people we met at EBC and during the bike ride yesterday were very curious about BeBe. So with Laura's blessing we took some more photos after our ride to post for your pleasure.

The headbadge - there's a better photo on Flikr.


The front of the seatpost - painted using a stencil
not a decal as usually seen with English-, American-, and Canadian-made bikes of the period.
On the back of the seatpost: Made in Hungary

Lovely lines, and pretty pinstriping too. I think this was all done by hand.


The chainwheel, with cottered cranks.


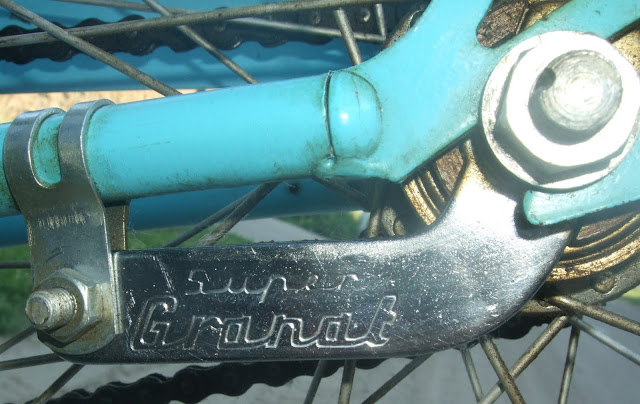
The single speed coaster brake is labelled Super Granat.


There's a serial number stamped into the fork right above this dropout. I suppose if there was more information online we would be able to use it to date the bike for certain. It has the format HL #### 57 - which suggests that possibly it stands for the plant in Hungary, four digit production series number, 1957. But that's totally a guess.

From what others have posted on the net, it appears that this would have been sold by Eaton's, the defunct Canadian department stores, and would originally have had a white tool bag as well. Apparently the Road King house brand was made by a number of different manufacturers over the years, including CCM, and was also used for motorcycles